
4 Holiday Gift Ideas You Can Make With Your Child

Brighten someone’s day this holiday season with some simple handmade crafts you can make as a family. Not only are you creating beautiful handmade gifts, you are spending quality time with your child. Not to mention, you are helping your child develop her creativity, develop fine-motor skills, and of course, bond with you.
The teachers at New Horizon Academy are experts at creating holiday gifts with children, so we asked them to share some of their favorite ideas. Here are a few of their favorites that you and your child can do at home together. The ideas can be modified for children of all ages—infants, toddlers, preschoolers, and school-age children, too.
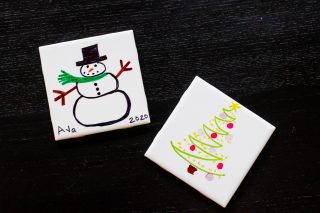
Personalized Coasters
Materials Needed
- White ceramic tiles
- Sharpie permanent markers
- Clear sealant/finish
- Table covering
Instructions
- Cover your workspace, as your child is working with permanent markers.
- Let your child decorate the tile. (He may draw a picture, write a message, or a combination of both.)
- After your child completes his designs, spray the tile with a thin coat of the clear finish and let it dry for 24 hours.
- Share with loved ones.
Personalized Scribble Mug

Materials Needed
- White ceramic mug
- Painter pens
- Stickers – letters and shapes (optional)
Instructions for Infants and Toddlers
- Hand wash and dry your ceramic mug.
- After it is dried, let your child start drawing on the mug.
- If you have a toddler, you may want to use stickers.
- Place desired stickers onto the mug. (Spell out Nana, Dad, etc. or add shape stickers onto the mug)
- Let your child use the painter pens to color the mug. She can scribble on the mug and directly over or around the stickers.
- After the paint dries, remove the stickers and put your mug in the oven at 350°F for 30 minutes.
- Remove the mug from the oven and let it cool for another 30 minutes.
- Share with loved ones.
Instructions for Preschoolers and School-agers
- Cover your workspace, as your child is working with paint pens.
- Hand wash and dry your ceramic mug.
- After it is dried, let your child start drawing on the mug.
- After your child is done with her drawing, put your mug in the oven at 350°F for 30 minutes.
- Remove the mug from the oven and let it cool for another 30 minutes.
- Share with loved ones.
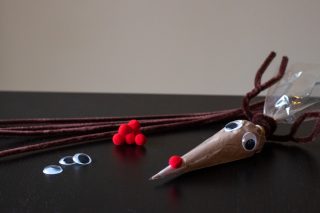
Hot Cocoa Tubes or Cones
Materials Needed
- Disposable piping bags or plastic tubes
- Hot cocoa packets
- Mini marshmallows
- Mini chocolate chips
- Ribbon or twine
- Brown pipe cleaners
- 1 red craft pom-pom
- 2 craft wiggle eyes
- Hole punch for tag
- Table covering
- Funnel
Instructions
- Cover your workspace, as your child may spill.
- Place hot cocoa inside the first disposable piping bag or tube. (If you are using a tube, you will need a funnel to pour in the hot cocoa.)
- Next, pour in chocolate chips. (If you are using a tube, you will need a funnel to pour in the hot cocoa.)
- Next, put in the marshmallows and tie that off with rubber band if you are using a piping bag. If you are using a plastic tube, add cap. (If you are using a tube, you will need a funnel to pour in the hot cocoa.)
- Use ribbon or twine to decorate.
- If you are feeling ambitious, you can create a hot cocoa cone that looks like a reindeer.
- Place pipe cleaners around the top of the cone and shape as antlers.
- Glue on eyes and red pom-pom for the reindeer nose.
- Share with loved ones.
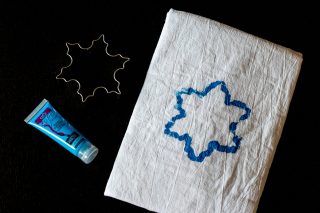
Holiday Dish Towels
Materials Needed
- White flour sack dish towels
- Unsharpened pencils
- Fabric paint
- Pen
- Scissors
- Cookie cutters of your choice
- Contact paper
- Masking tape
- Cardboard
- Cover for your workspace
- Paper plate
Instructions
- Cover your workspace, as your child is working with fabric paint.
- Place cardboard on the table.
- Open the flour sack dish towel and tape to the cardboard.
- Choose your cookie cutter and trace onto the back of the contact paper.
- Cut out, and peel off the backing.
- Place your shape on the dish towel.
- Choose paint and pour it onto a paper plate.
- Using an unsharpened pencil, dip it in the paint and stamp around the shape on the towel.
- Once the majority of edges around the contact paper shape are covered, remove the contact paper shape.
- Let the paint dry for 24 hours.
- Share with loved ones.
Download PDF
